 If you need to create an encrypted PDF with password protection, forget about buying Adobe Acrobat or other expensive software, because Mac OS X has you covered with built-in tools. Yes, the Mac can natively create secure password protected PDF documents, meaning it’s free, and it’s also impressively easy to do.
The great thing about the protection is that it’s achievable through almost any Mac app, because the password layer is created from the OS X standard “Print to PDF” trick. Essentially that means if you can print the document, you can probably password protect it as well. For this walkthrough we’re going to use TextEdit, but you are free to use another app if that’s what you’d prefer.
Add Password Protection to a PDF File in Mac OS X for Free
This can be used to convert an existing file to a protected version, or to add protection to a document:
Open any file you want to convert to a password protected PDF
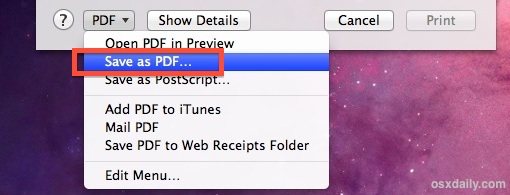
Go to File > Print, and click the “PDF” button to choose “Save as PDF…”

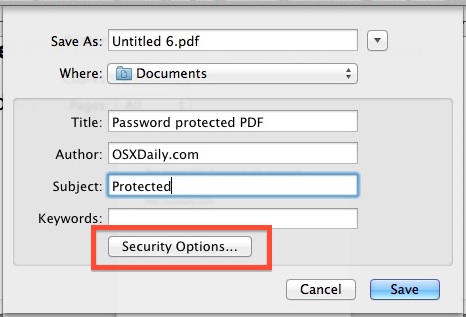
Name the file as usual, and optionally, provide an author and title, then click the “Security Options” button

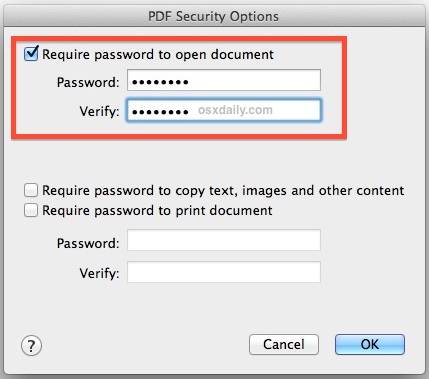
Check the box next to “Require password to open document” and enter a password, enter it again to verify, then choose “OK”

Save the PDF document as usual
Optionally, you can also set passwords to be able to print the document, or even copy text, images, or anything else from it. That’s not what we’re focusing on here though, we’re aiming for broader password protection.
Once the file has been saved, go and locate the secured PDF that was just created. You will find the icon has changed from the normal PDF indicator icon to one with a lock on it, showing that it has been secured with password protection.
Opening the protected PDF in Preview app will bring up the following screen, informing the document is password protected and to enter it in order to view the contents of the file:

Entering the correct password reveals the full contents of the PDF instantly:

Test it out if you’d like, but entering the wrong password does nothing. Attempting to view the file in Quick Look also asks for the authentication, and trying to forcibly open the encrypted PDF will result in a page full of gibberish appearing rather than any of the actual content.
This is an excellent feature to use when sharing confidential documents through standard file sharing methods, messages, or email, and it’s also a nice trick to manage your own private information that may require password protection, particularly if a single file does not need to be modified again in the future. The limitation on editing the PDF is perhaps the main caveat of this approach, but that is fairly expected behavior with most .pdf documents anyway.
Though this PDF trick is reasonably secure and will be acceptable for many casual uses, it should not be viewed as having the same level of security as something like a strongly encrypted folder image or archive. For situations where more security is needed, and for groups of files that need password protection, a protected zip archive is a great way to go, and it also adds a level of file compression which makes it ideal for remote file sharing and transfers. Otherwise, for local files that need occasional access combined with editing abilities yet maintained with very strong encryption, using the protected files trick locks down a folder which is then accessible as a disk image only after a proper password has been entered. The latter is perhaps the most secure option available in OS X that doesn’t include FileVaulting the entire drive, thanks to the extremely strong 128-bit AES encryption that applies to not only the folder, but it’s contents as well.