WiFi Explorer review: Find problems with and optimize your wireless network

Adrian Granados’s $3 WiFi Explorer (Mac App Store link) is a nifty Mac utility that allows you to gather an impressive complement of data about all the Wi-Fi networks within range of your Mac. It shows you a plethora of numerical data points, but it also graphs the signal strength of each network, and it shows which networks overlap on common channels. It supports 802.11a/b/g/n networks in both the 2.4 GHz and 5 GHz frequency spectrums, as well as 802.11ac networks on the 5 GHz band.

WiFi Explorer

On launch, WiFi Explorer finds any discoverable wireless networks in range, listing them in the top half of the main window. Below that list are four tabs: Network Details, Signal Strength, 2.4 GHz Channels, and 5 GHz Channels. Select a network and then click a tab to view the corresponding info for that network.

The Network Details tab provides an overview of various metrics corresponding to the selected network. Here, network administrators and tech savvy end users can easily find detailed information such as the SSID (network name), BSSID (Basic Service Set Identification, which is the hardware MAC address of the device), data rates supported, hardware vendor, signal quality, signal-to-noise ratio, and much more. Additionally, a live graph of signal strength shows the average, minimum, and maximum values calculated over time.

The Signal Strength tab shows a live-updated graph of the selected network’s signal strength. You can use this graph as a tool to optimize your Wi-Fi network’s coverage: As you roam around your home or office, laptop in hand, you can watch the graph to find “dead spots.” Based on those findings, you can experiment with moving your Wi-Fi access point(s) to different locations to get the best coverage.

To read this article in full or to leave a comment, please click here
QuickBooks for Mac 2014 review: Full of small updates, still no Windows file compatibility

If this is your first look at the new QuickBooks for Mac 2014 you’re likely to think it represents little more than a change of paint on an app that is substantially the same as its predecessor. While that’s not entirely true, it’s also not too far from wrong. But QuickBooks’ new paint job isn’t the only thing that’s changed about the app. QuickBooks for Mac offers a number of small new improvements that should help enhance the application’s value and give you a better clue as to how your business is doing.

QuickBooks Mac 2014

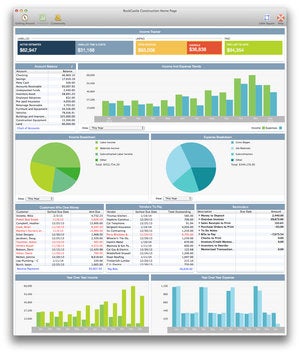
QuickBooks for Mac’s new income tracker provides an excellent overview of your business’ financial health.

I know the question you’re going to ask first and the answer is, “no.” There is no file level compatibility between the Mac and Windows versions of QuickBooks and, after asking this question of Intuit for more years than I care to count, I’ll be surprised if the answer will ever be, “yes.” That said, Intuit has made it easier to send data to and update data from your accountant.

Earlier versions of the app required that you use QuickBooks’ Roundtrip feature to create a backup of your Mac data file that could be restored in the Windows version of QuickBooks. Unfortunately, while your accountant worked on your file you couldn’t make any changes to the data on your Mac. Now QuickBooks for Mac allows you to import journal entries, which is essentially the debit and credit information for every transaction you create. This lets your accountant make changes to your data while you continue using QuickBooks. When your accountant is done updating your data you simply import the journal information.

To read this article in full or to leave a comment, please click here
Advice from an Apple Tech: How to replace the optical drive in a Unibody MacBook Pro with a second hard drive

Sometime around 2008 and with the advent of the first MacBook Air, Apple made the declarative statement that the end was in sight for optical drives built into its notebooks. At the time, the lack of an optical drive was a unique feature for the company’s new ultralight notebook, and the MacBook and MacBook Pro units of its day still unquestionably arrived with optical drives, but change was in the air.

Now, at the end of 2013, Apple definitely had a point in asserting that the optical drive could be done without—especially when a USB optical drive can now be purchased for under $35—and an incredibly fast and useful second hard drive can be installed in your Unibody MacBook Pro.

This is what this how-to covers:

  • Removing both the optical drive and hard drive in the MacBook Pro;
  • Placing the laptop’s hard drive in a bracket and installing it where the optical drive used to be;
  • Installing a new solid-state drive (SSD) in the laptop’s hard drive compartment, which makes the SSD as the primary drive.

With that in mind, it’s time to look into swapping out your Unibody MacBook Pro’s optical drive for a speedy hard drive. Here’s a list of items that you will need.

To read this article in full or to leave a comment, please click here

Master the command line: How to use man pages

If you’ve read Macworld for any length of time—particularly our OS X Hints blog or any other story that asks you to use Terminal—you may have wondered to yourself: How do you learn about all those mysterious commands, such as ls or cd? Is it some kind of arcane knowledge, handed down only to initiates after grueling initiations? Well, no. Actually, anyone can learn about Terminal commands, if they know where to look. Today, I’ll tell you where.

Man up

The key to Terminal wisdom is the man command. It summons manual (or man) pages for almost any command; they’re the equivalent of a help system for the command line. In fact, man itself is a command, whose role is to format and display this documentation.

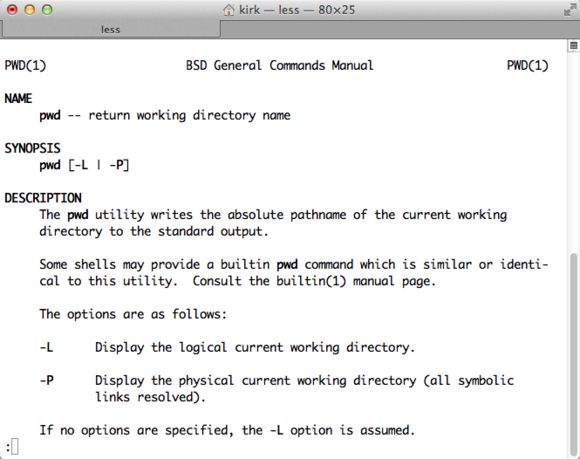
First, launch Terminal (in your /Applications/Utilities folder). Then, if you type man pwd, for example, Terminal will display the man page for the pwd command.

The beginning of the man page for the pwd command.

All man pages have a common format. They begin with name (the name of the command) and a brief description of what it does. The pwd command I looked at above shows the following:

To read this article in full or to leave a comment, please click here

TYLT Bluetooth Tunz speaker

Every company that can design an enclosure and cram some speakers into it is vying for the eye of music aficionados. There is no end in sight for the numerous configurations of Bluetooth-enabled speakers for those that need something greater than the s…

Fieldrunners 2 review: Terrific tower defense game with a preposterous body count

Editor’s Note: The following article is reprinted from Macworld U.K. Visit Macworld U.K.’s blog page for the latest Mac news from across the Atlantic.

Fieldrunners 2

Like most tower defense games, Fieldrunners 2 is based on a pretty hideous premise when you think about it. You throw up a few machine gun emplacements, maybe a couple of static missile launchers or some pipes to spray the enemy with crude oil while they get roasted alive by flamethrowers, then the cannon fodder turn up. Hundreds and hundreds of them: cutely designed goons sprinting gamely forward, clambering over the butchered carcasses of their buddies. They’re not even armed. What are you, some kind of monster?

One of the ways Fieldrunners 2 prevents you from dwelling on silly thoughts like this is to keep your mind constantly occupied. There are always problems to address, threats to deal with, towers that you need to get round to upgrading, or weak spots in your defenses that need filling. It’s a brilliantly frenetic game.

Fieldrunners 2

If you’re new to the tower defense concept, it’s a straightforward one. The enemy assaults you with waves of mobile troops; your job is to prevent these from getting to the other side of the screen by spending your money (that you earn by killing) on gun towers in strategic combinations that will funnel the bad guys into bottlenecks and then shoot them to pieces. (There I go, sounding all murderous again.)

To read this article in full or to leave a comment, please click here

Logitech Ultrathin Touch Mouse for Mac Review

Roughly the same width at its widest point as an iPhone (2.25 inches) but only two-thirds the length (3.25 inches), Logitech’s Ultrathin Touch Mouse for Mac is light as a feather at less than 2.5 ounces. The pearl-white surface gently slopes downward from back to front, allowing ample space for finger gestures, yet it’s responsive enough to detect the slightest movement.

Even for folks with beefy hands, the Touch Mouse is easy to use, although our fingers did receive a workout after a full day of mousing across a 27-inch Thunderbolt Display. The device features a satisfying click noise that confirms this is a quality, well-built mouse that’s a pocket-friendly companion for MacBook owners. It can be charged using the included USB cable; Logitech claims a one-minute charge keeps the Touch Mouse working for an hour, and we managed three straight days of testing on a 30-percent charge.

Touch Mouse connects via Bluetooth, but a free software download is necessary for full control, including seven available gestures. Logitech Preference Manager mirrors Apple’s own gestures pane—mouse over an option and a brief video shows how it works. However, there aren’t enough tap and button commands to enable all of the available options at the same time.

Logitech also added the ability to pair with two different computers just by flipping a switch on the base of the device. “Easy-Switch” makes it possible to use on both laptop and desktop without having to pair each time—perfect for those who take advantage of slipping the device into their pocket between home and work.

Although we rank Logitech’s Touch Mouse exceptionally high as wireless mice go, there’s one thing standing in the way of a higher score: Magic Trackpad. We’ve been spoiled by Apple’s silver platter and its expanded set of gesture options, but it’s too awkward for travel, so Touch Mouse is a laptop bag must-have for our next trip.

The bottom line. The Logitech Ultrathin Touch Mouse makes a perfect travel companion, although its more limited gesture options keep it from being a replacement for our Magic Trackpad.

Review Synopsis

Company: 

Logitech

Contact: 

Price: 

$69.99

Requirements: 

OS X 10.6.8 or later, USB port (for recharging), Internet connection (for Logitech Preference Manager software download)

Positives: 

Stylish, pocketable mouse nicely complements MacBook. Can be paired with two different computers. Long battery life. Recharges quickly via USB.

Negatives: 

Limited gesture options. Small size may cause finger fatigue with larger monitors. Preference Manager software requires restart.

Score: 
4 Great

5 resolutions for a better digital life

It’s the time of year when we make promises for the new year that are routinely broken before that year is a week old. And for this reason, far too many of us simply resolve to never make another resolution. (Because, after all, that’s an easy one to keep.)

But when it comes to the health of your computer and Internet life, it pays to make a greater effort. With that in mind, I’ve resolved to end 2013 with a list of resolutions (and the consequences of not living up to them) to be carried out in 2014.

I will back up my data

The two things that people lie about most are the frequency of their flossing (fewer than 30 percent of people in the U.S. do it routinely) and the integrity of their data backup. “Oh sure,” they claim, “I have a backup.” But dig deeper and ask “And so you’d have no problem if I used this powerful magnet to wipe your hard drive or tapped your iPhone’s Erase All Content and Settings button?” and the squirming begins.

Your dental hygiene is between you and the person standing within four feet of your cake hole but I take this backup business seriously. I can’t tell you the number of times I receive questions about how to recover this or that bit of data only to learn that such data hasn’t been backed up since the last government shutdown.

To read this article in full or to leave a comment, please click here

Master the command line: Navigating files and folders

If you’ve been using a Mac for any length of time, you know that it’s more than just a pretty point-and-click, window-and-icon interface. Beneath the surface of OS X is an entire world that you can access only from the command line. Terminal (in your /Applications/Utilities folder) is the default gateway to that command line on a Mac. With it, instead of pointing and clicking, you type your commands and your Mac does your bidding.

Why would you want to do that? For almost all of your computing needs, the regular graphical user interface is enough. But the command line can be handy when it comes to troubleshooting your Mac, to turn on “hidden” settings, and other advanced chores. Many of the hints we publish on the Mac OS X Hints website require the use of the command line. It’s a good idea for anyone who isn’t an utter beginner to be familiar with it.

If you aren’t already familiar with OS X’s command-line interface, this week we’ll get you up to speed. The plan is to cover the most important commands you need to know and show you how to use them. First up: How to navigate the file system from the command-line prompt.

The prompt

By default, when you open Terminal, the first thing you’ll see is something like this:

To read this article in full or to leave a comment, please click here
How to shoot the best portraits with your iPhone

The iPhone is a capable device for most of our daily snapshots. And even though it’s not quite as versatile as a dedicated digital camera, you can still capture stunning portraits. Here are some great techniques for top notch people shots using the camera you always have with you.

Reflectors for fill light

The iPhone’s LED flash is decent for indoor photography, but isn’t strong enough to serve as a fill flash in bright daylight conditions. When outdoors, you can add more pop to your pictures by using a reflector.

Photographers often use collapsable disc reflectors for this purpose. Chances are good that you don’t have this accessory in your backpack. But you may have a car windshield shade available.

For self portraits, hold the reflector on the opposite side of the sun and bounce the light into your face. If you have a friend with you, they can hold it instead. Many windshield shades have both a shiny and a white side. In bright conditions, the white surface should work just fine. On partly cloudy days, you may want to use the shiny side to direct more light onto the subject.

To read this article in full or to leave a comment, please click here

Fitbit One Review

The shocking truth about tech journalists is that we often spend ridiculous amounts of time sitting in front of our computers. Sure, the bosses love it, but often that’s not so great for our health. In an effort to clean up my act fitness-wise, I decided to employ some tech to reverse my slide into desk-potatodom.

Fitbit One is a pedometer about the size of a peanut (in the shell). It attaches to your belt or in your pocket with a silicone clip, where it constantly counts the number of steps you take, as well as altimeter readings that track when you climb stairs or hills. There’s a tiny LED display, which cycles through various data displays at the press of the One’s singular button. Although there’s an included USB dongle for wireless syncing to a Mac, iOS device users can also sync wirelessly via Bluetooth, which offers the advantage of not taking a USB port. 

Setting up a Fitbit is simple enough. A quick trip to www.fitbit.com allows you to create a profile, set weight goals, and activate your One. Once that’s all taken care of, all you really need to do is wear the One and it’ll keep an eye on your physical activities, syncing all that data back to the Fitbit website where you can track your progress with various charts and graphs.

In addition to your total steps, the Fitbit One can also track your sleep when you wear it in the included armband at night. Unfortunately, to track sleep, you have to remember to put the device in sleep mode before you go to bed and take it out of sleep mode first thing in the morning. Once the novelty wore off, I often forgot to activate sleep mode or forgot to turn it off in the morning, rendering some crazy sleep stats that weren’t terribly useful. Also, the One has a tendency to pop out of the pocket in the armband during the night, leading to several mornings spent searching in the sheets and on the floor for the tiny device. While I liked the idea of tracking my sleep, the realities of actually doing it proved to be more trouble than it was worth. Plus, the Fitbit needs to be charged about once a week—a task best accomplished overnight—which leads to incomplete sleep data anyway.

Inconveniences aside, wearing the Fitbit does work. Of course, the device itself doesn’t make you healthier, but seeing your daily activities quantified is a great motivator to get moving more. On the Fitbit website you can also track what you eat, and add other activities that Fitbit’s pedometer can’t track, such as swimming or riding a bike.

When all is said and done, using the Fitbit has helped me drop nearly 25 pounds over the last two months. Not bad, considering that I haven’t set foot in a gym, and have only made moderate (and sustainable) tweaks to my diet.

The bottom line. It’s not a magic pill, but if you’re the type who thrives on quantifiable data, the Fitbit One can help you get a handle on your love handles.

Review Synopsis

Product: 

Company: 

Fitbit

Contact: 

Price: 

$99.95

Requirements: 

Mac OS X 10.5 or later

Positives: 

Small. Provides lots of data.

Negatives: 

Armband is cumbersome. Wireless syncing to a Mac requires USB dongle.

Score: 
4 Great

Mac Gems of the Year: 2013

As the end of the calendar year nears, Macworld editors have been busy picking our favorite products of 2013. A couple weeks ago, we presented our Macworld Editors’ Choice awards to the best overall Mac- and Apple-focused products. But here in the Mac Gems department, we also like to separately recognize the best inexpensive Mac apps we’ve reviewed over the past year.

As the editor who coordinates the Mac Gems section, and who spends lots of time searching for great, inexpensive Mac software, I see a lot of Mac apps each year. While our Eddy-award winners are anointed after a weeks-long process of deliberation involved the entire Macworld editorial staff, the Gems of the year are my personal picks. These aren’t necessarily the highest-rated Gems of the past year—they’re the apps we’ve covered in Mac Gems that either did something especially innovative; offered exceptional value; or simply earned a place in my (or another editor’s) daily workflows. Here are 13 apps you should take a look at to see if they’ll fit in—and improve—your routines.

(You can also check out my 2012 picks, 2011 picks, 2010 picks, and 2009 picks.)

Eddy-winning Gems

Every year, one or more Gems is so good that my fellow editors and I choose these apps for our highest honor: an Editors’ Choice award. This year, an unprecedented five Mac Gems also earned Eddy awards.

To read this article in full or to leave a comment, please click here

First look: Promise’s Pegasus2 R6 Thunderbolt 2 RAID array

When Apple released the new Retina MacBook Pro last October, it also marked the debut of Thunderbolt 2 in an Apple product. But with no Thunderbolt 2 peripherals available at the time, we here in the Macworld Lab were left to test these new systems using older device using the original Thunderbolt.

The wait is over. The Pegasus2 R6 from Promise is the first Thunderbolt 2 peripheral to make its way into the Macworld Lab. It’s a six-drive, 12TB hardware RAID box available from the Apple Store for $2299. You might remember that Promise was also first out of the Thunderbolt gate with its original Pegasus line of multiple drive RAID boxes.

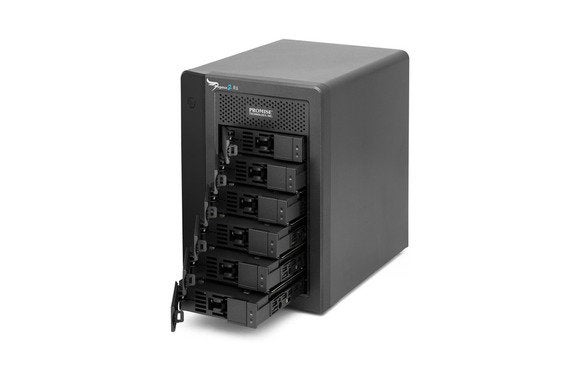
Promise Pegasus2 R6

The Pegasus2 R6 model we received has six 7200 RPM hard drives with 2TB of capacity each, the same as the first Pegasus we reviewed. The Pegasus2 is a hardware RAID and can be configured easily to RAID 0, 1, 5, 10 or JBOD.

The new model has two Thunderbolt 2 ports to allow for daisy chaining up to six compatible devices. Some Thunderbolt products have just one port, meaning that it must sit at the end of the chain. Having two ports gives you more flexibility and have two Thunderbolt 2 ports means that you can connect more Thunderbolt 2 devices.

To read this article in full or to leave a comment, please click here