Contact Sheets, often called Proof Sheets, are essentially columns and rows of image thumbnails, making a bunch of photos very easy to quickly review. Though they’re commonly used by photographers, they have a wide range of uses outside of the pro-photography world, from artists to designers to UI/UX engineers. Rather than creating a contact sheet by hand the hard way in Photoshop or Pixelmator, we’ll show you to instantly generate one that is fully customized, all you’ll need to do is select a group of pictures in the Mac file system and let the excellent OS X app Automator do the hard work. Everything used here is free and bundled into Mac OS X, there’s no need to buy anything else or download any other apps.
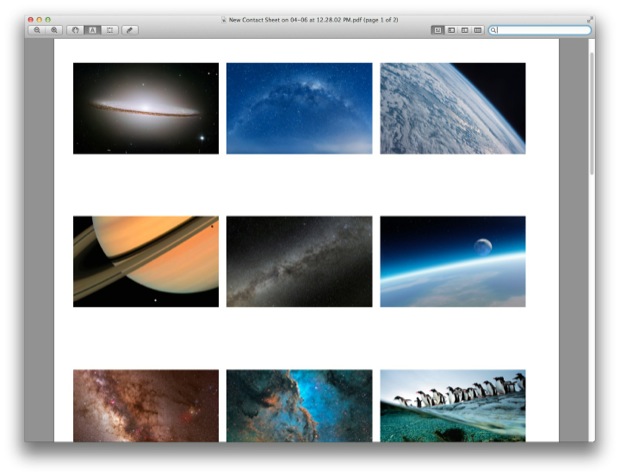
The end result will be able to contact sheet PDF file that is a specified paper size with a chosen number of thumbnail columns, saved to where ever you want, and it will look something like this:

The resulting file is smart enough to not overwrite itself too, and it will automatically append the date and time to the file name like “My Contact Sheet on 04-06 at 2.42.36 PM.pdf” so that you can’t overwrite one proof sheet with another if several have been created. Enough talk, let’s get started!
Create the Contact Sheet Generator Service
This will create a service that generates contact sheets instantly for you:
Launch Automator, found in /Applications/, and from the File menu choose “New”
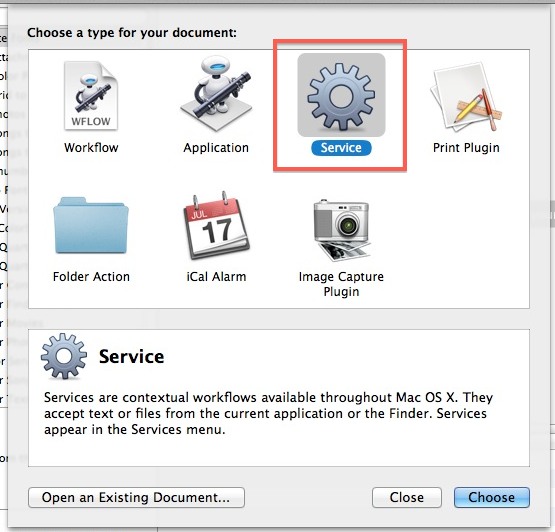
Choose “Service” from the new menu

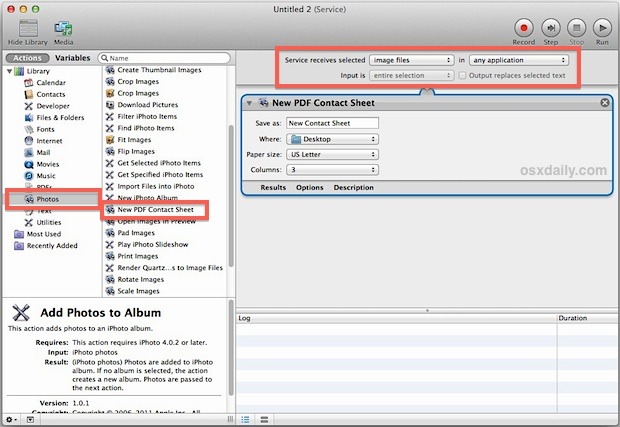
Look under the “Library” column on the side and select “Photos”, then in the next column find “New PDF Contact Sheet” and double-click it to add to the new service
At the top, look for “Service receives selected:” and choose ‘image files’
Set the Contact Sheet customizations under “New PDF Contact Sheet”, including where to default to saving the file to (~/Desktop is standard), the Paper size, and how many columns will be shown
When satisfied with the customizations, go to File then “Save” and give the automator service a name like “Make Contact Sheet”

Quit out of Automator if you’re satisfied, or leave it open if you want to try out the results and then make adjustments based on what you find.
The hard part is now over, and that wasn’t so tough was it? Now let’s go ahead and make a new contact sheet almost instantly from the OS X Finder.
Make a Contact Sheet by Generating from Selected Images
Now that the Automator Service has been created, making a contact sheet is just a matter of selecting images and letting the generator do the work for you:
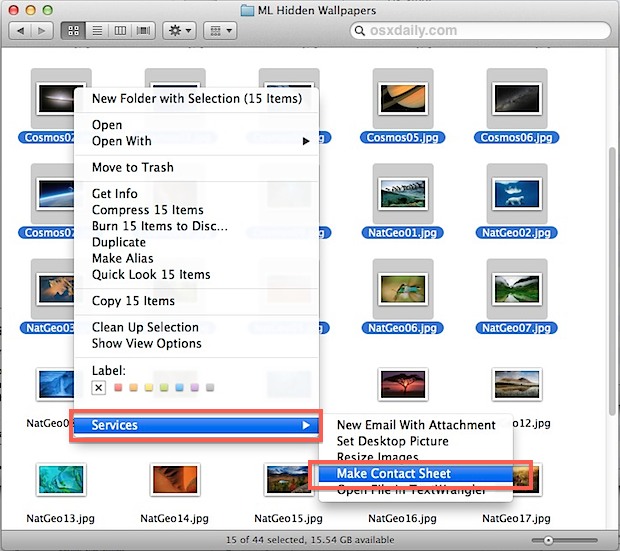
Locate and select any number of images in the OS X Finder
Right-click any of the selected images and go to the “Services” menu, then choose “Make Contact Sheet” (or whatever the name was that you picked when saving the service)
Wait a few seconds or a few minutes, depending on if you chose a handful of images or hundreds for the PDF file to generate
Go to the ~/Desktop (or where ever else the save location was chosen) to find the generated PDF

The file generation is usually extremely fast, though how long it takes is going to partially depend on how fast your Mac is, and of course how many pictures you chose for the sheet. If you used a folder of 500 high resolution images, it will take a couple minutes usually, versus generating the sheet from a collection of 50 lower resolution pictures, which takes only a few seconds. For this reason, it can be a good idea to scale down images before creating a contact sheet from particularly humungous files, but if you find yourself having to perform a ton of image resizing you can also create a simple ‘Batch Resize’ Service with Automator, or just do a manual bulk resizing process on a group of pictures using Preview app, which also comes with every version of Mac OS X.
Open the file in Preview to see how the generated sheet looks, it will have followed the guidelines chosen during your initial setup so if you’re not happy with it make some changes to the Service and just save it again, then generate a new sheet PDF.
Generally speaking, numbers that are consistent multiples of the columns chosen during the creation of the service look best. Meaning, if you picked 6 columns, anything that is a multiple of 6 (12, 24, 36, 600, etc) will tend to look the best, so that each column and row is even. Also, images that are of the same width tend to look best as well, since it creates an even amount of white space between them.
Here’s another example of the output of this Automator Service, this one showing a 3 column layout with wide images:

And no the images contained in the example proofs are not my pictures, they are from the hidden wallpaper collection buried in OS X 10.8 and later.
Enjoy!