 by
by Though we generally recommend staying on the latest versions of OS X, some users may find incompatibilities or problems associated with updating their Macs to OS X Mavericks, and for these unique circumstances it can make sense to downgrade the Mac back to a prior release version of OS X. For such specific cases, we’ll cover downgrading from Mavericks (10.9) back to OS X Mountain Lion (10.8). To accomplish a downgrade using this method, you must have made a Time Machine backup made prior to the OS X 10.9 upgrade / install. If you do not have a Time Machine backup prior to OS X 10.9 being installed, this particular walkthrough will not work for you.

Be sure to back up the current volume and all files before attempting the downgrade process, otherwise you may lose the files and data that was created between the original upgrade to Mavericks and this downgrade procedure.
Downgrading OS X Mavericks to OS X Mountain Lion
This will downgrade a Mac running OS X Mavericks (10.9) to OS X Mountain Lion (10.8). Yes, this also works to downgrade to OS X Lion (10.7), but Lion is buggy and we do not recommended it. If given the choice, always run OS X Mountain Lion or stay on OS X Mavericks instead.
Back up the Mac with Time Machine before beginning, easily down by choosing “Back Up Now” from the Time Machine Menu, or at the very least manually back up your critical files – this is important do not skip this
If the drive is not already connected, connect the Time Machine volume to the Mac which contains the prior OS X 10.8 backups on it
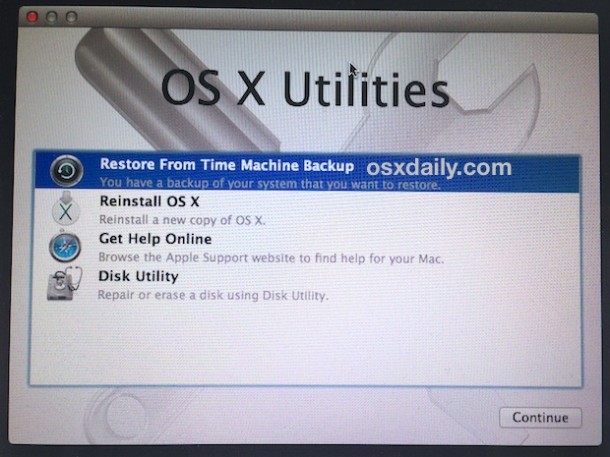
Reboot the Mac and hold down Command+R to boot into the restore menu
At the OS X Utilities boot selection menu , choose “Restore from Time Machine Backup”
Read the “Restore Your System” screen, understand what you’re doing, and click “Continue”

Select the backup source – this should be the Time Machine drive that contains the OS X Mountain Lion installation

Select a backup that corresponds to a date, time, and Mac OS X version that you want to restore to – be sure the Mac OS X Version is “10.8.x” to insure you are downgrading OS X back down to Mountain Lion, then choose “Continue”

At the “Select a Destination” menu, choose the primary Mac hard drive, typically named “Macintosh HD”, then choose “Restore” to begin the downgrading process

Let Time Machine finish restoring from OS X Mountain Lion, the Mac will automatically reboot when finished downgrading from OS X Mavericks
When the Mac boots, you’ll be back to OS X Mountain Lion and everything will be restored to exactly how it was at the last backup made with Time Machine prior to upgrading to OS X Mavericks.
Now is a good time to restore your individual files created when running OS X Mavericks, either manually if you copied the files to a volume yourself, or through Time Machine.
Finally, another downgrade option would be to format the Mac and perform a clean install, similar to performing a clean Mavericks install, but using a prior version of OS X as the installer drive. That’s a topic for another walkthrough though.